 (1).png)
Surya Namaskar: Along with the body, the mind also remains healthy, learn here the right way to do Surya Namaskar step by step.
Surya Namaskar Step by Step: Everyone knows that there are many benefits of doing yoga. By doing Surya Namaskar, along with the body, the mind also remains healthy. Bollywood celebs also share their videos on social media many times while doing Surya Namaskar. B-Town's hottest mom Kareena Kapoor once told that she does 108 Surya Namaskar every day. If you too are looking for a fitness workout that does everything for your core, fitness, muscles and calories, then try Surya Namaskar. To do it properly, one must know about some important things. Keep in mind that you start Surya Namaskar with your right foot because Surya Nadi moves to the right. Surya Namaskar must be done in front of the sun in the morning. Learn here step by step how to start this namaskar practice...
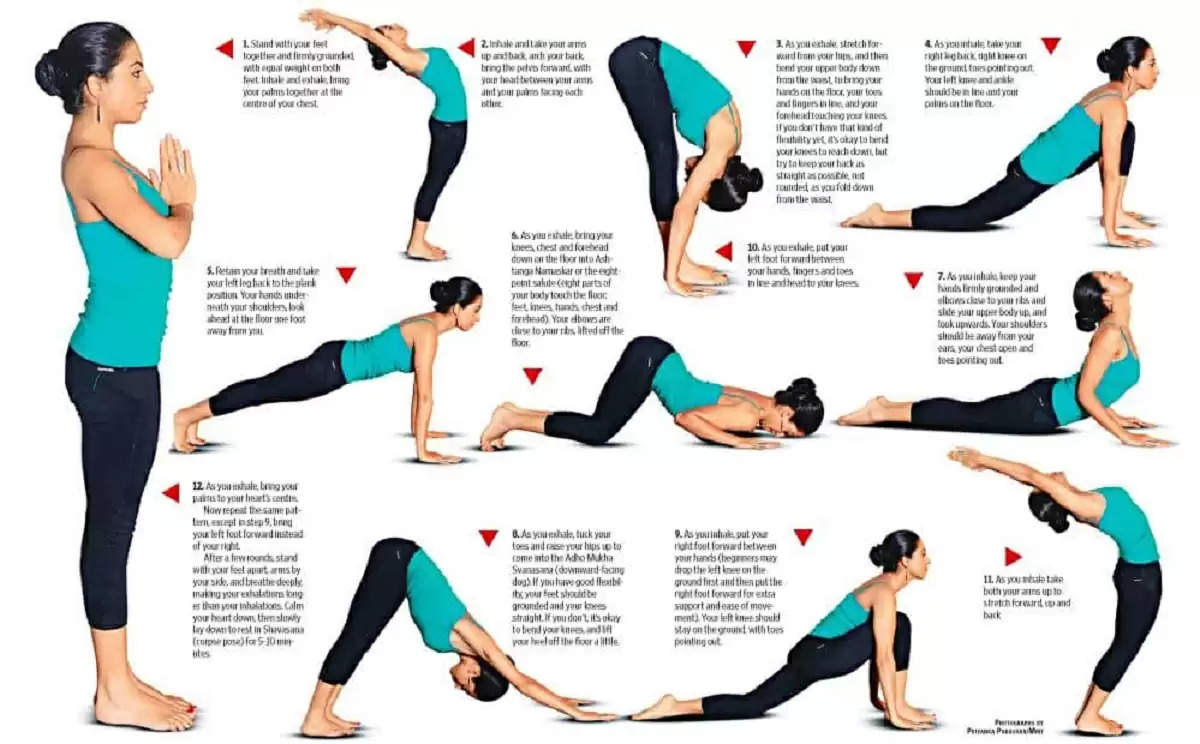
Posture 1: Pranam Asana
Begin this asana by standing straight. Stand up keeping your spine straight and straighten the posture.
Posture 2: Hastautanasana
Raise your palms above the head and stretch upwards. Tilt your head, neck and upper back slightly to create a slight arch. Keep in mind that when you bend your upper body backwards, your arms should be next to your ears.
Posture 3: Hastapadasana
Exhale and slowly bend your upper body down from the hips and tuck your nose between your knees. Keep your palms on either side of your feet. In the beginning, you may have to bow down. To accomplish this, bend your knees. With practice slowly straighten your knees and try to touch your thighs to your chest.
Posture 4: Horse Running Pose
Keep your body weight on your palms. Make sure that your palms are completely flat on the floor. Take your right leg back and place it towards the back edge of the mat. Make sure that your toes are touching the floor and your heel is pointing up. Is. Bend the right knee and place it on the floor. When you press down on your toes, point them out. Your left knee should be in line with your left ankle. Maintain an angle of 90 degrees at the knee joint between the upper and lower leg. Keep in mind that your back is not arched, let your neck fall backwards and look towards the sky.
Posture 5: Plank Pose
Turn your right toes inward and lift your right knee off the floor. Grip the floor with your toes and keep your knee straight. Lift your left leg off the floor, extend it backwards and keep it parallel to your right leg. Elbows and make sure that your wrists are directly under your shoulders Make sure that your back is not arched and your spine is straight Focus your gaze forward.
Asana 6: Ashtanga Pranam Asana – Eight-Limbed Bow Pose
Lower your knees to the floor, lower your chest to the floor, lift your elbows and lower your shoulders. Your palms should be under your shoulders and bring your elbows close to each other. Both feet with the floor, both knees, both sides of the shoulders and both palms are the 8 parts in question that should remain in contact with the floor.
Posture 7: Bhujangasana - Cobra Pose
Lift your chest off the floor, lifting it to create a gentle arch in your back. Keep in mind that your navel touches the floor and your toes are bent inwards. Lower the toes, and spread them outwards, your elbows should remain bent. Tilt your neck and look upwards.
Posture 8: Adho Mukha Svanasana
Lower your chest towards the floor. Extend your arms and straighten your elbows. Push your head down with your arms. Your body should be triangular concerning the floor, now keep the hand's shoulder width apart. Apply pressure to your palms and open your shoulder blades. Try to push your heels into the floor. Keep in mind that your back should not be bent. Look at your toes.
Posture 9: Horse Running Pose
Bring your right foot forward and place it between your palms, bring your right knee in line with your right ankle, lower your left knee and keep it down, curl your left toes in and point them up and press towards. After giving slight pressure, spread them outwards, pushing your chest forward.
Posture 10: Hastapadasana
Raise your left knee off the floor. Bring your left leg forward and place your left foot between your palms. Keep your knees as straight as possible, and try to leave as little space as possible between your upper and lower body. Keep in mind that your back should not become a hump. Let your neck fall with gravity and tuck your nose between your knees.
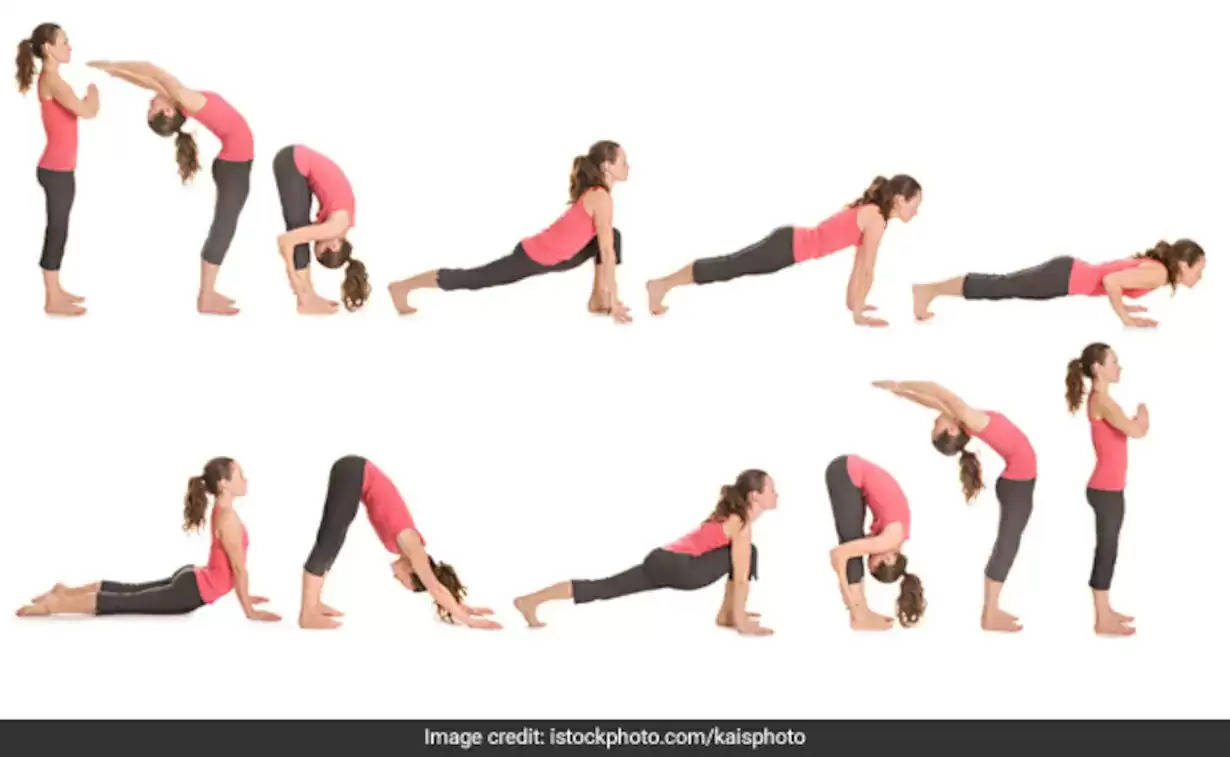
Posture 11: Hastautnasana
Tilt the neck and look forward. Bring your upper body in an upright posture. Extend your arms above your head. Join your palms and make pranam mudra. To soften, tilt your head, neck and upper back slightly. Keep in mind that when you bend your upper body backwards, your arms should be next to your ears.
Posture 12: Tadasana
Straighten your spine and stand straight. Lower your arms and bring your joined palms in front of your chest. Relax your shoulders and notice that your